I was recently put on Decor Duty, along with a few other parents, for my 1st grader’s choir concert at school. I decided that, with it being the first week of Spring, a Spring-themed backdrop would be entirely appropriate. I decided to create these fun and vibrant DIY Giant Paper Flowers to add to the scenery. Check out the details below!

We are a participant in the Amazon Services LLC Associates Program, an affiliate advertising program designed to provide a means for us to earn fees by linking to Amazon.com and affiliated sites. This post includes affiliate links. More details can be found here.
What we used:
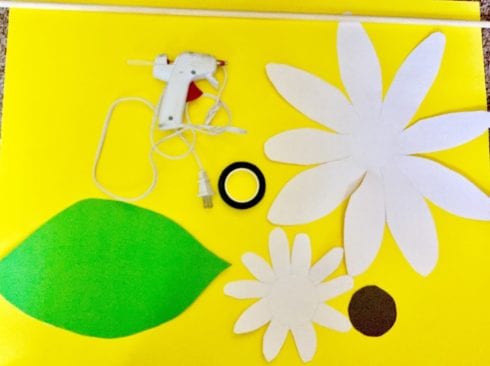
- Large Poster Boards in Various Colors
- Hot Glue
- Green Floral Tape
- Wood Craft Dowel Rod, 3/8-Inch
Instructions:
- To get started, cut out a large flower petals shape from a piece of poster board. (It doesn’t have to be the perfect shape, mine sure weren’t, but they still came out amazing.) This will be used as your stencil for the rest of your flowers.
- Cut out a large oval, pointed at the ends, to be the leaf shape. This will be your stencil for the rest of the leaves.
- Cut out a circle, to use as the stencil for the center of the flower. I simply traced around a large bottle of disinfectant spray.
- Once you have all your stencils ready, choose all the poster boards you want to use for the first flower, and trace the shapes onto them. I traced 2 of the large flower petals, and one of the small petals per flower. (For a couple of the flowers, I did double up on the smaller petals.)
- Cut out your shapes
- After petals are all cut out, I gave them a slight bend near its base to create a fluff effect once complete.
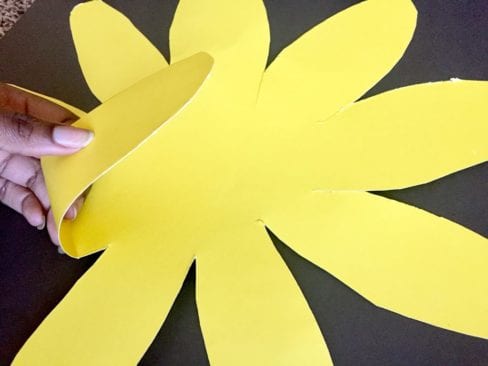
- Add glue to the center of the first petal, and attach the second large petal to it. Make sure the petals aren’t lined up perfectly. This will help add to that fluff effect.
- Add glue to the center of second flower petals, then attach smaller petals to it.
- Glue your circle to the center of the smaller petals.
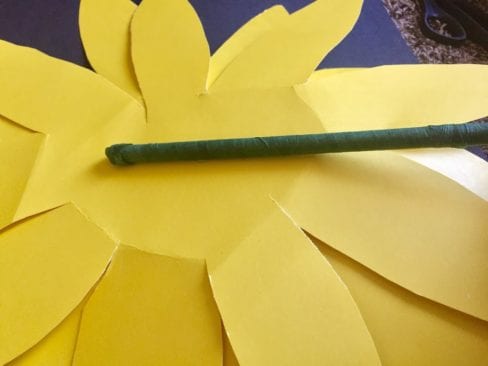
- Take your wood dowel, and wrap with green floral tape. We left about 4 inches on the end unwrapped, since we planned to put them in “flower pots” once complete.
- Apply a strip of hot glue about 4 inches long to the top of the wood dowel, and attach to the back of the flower.
- Stare in amazement.
- *As an added bonus, you can wrap a few boxes in brown packing paper to use as a flower pot. I decided to take this extra step so to help the flowers actually stand on the stage.
 |
| Here is what the finished product look like on the stage. |

Author: Briana Marie
Briana Marie is a yoga-obsessed Mom of 2 vibrant young girls. She has a BA in Communications and makes a living as a freelance writer, blogger, and owner/lead copywriter at Tanzek Media.When she is not typing away on the computer, she loves to spend time indulging in some of her favorite creative outlets and enjoying the great outdoors. Briana is a huge advocate for “freeing your inner child,” and encourages her fellow Moms to make stress-free FUN a priority in their lives.Briana’s blog Major League Mommy focuses on effective Parenting Made Fun. You can follow her journey on Facebook, Twitter, Instagram, and Pinterest.

Briana Marie is a yoga-obsessed Mom of 2 vibrant young girls. She has a BA in Communications and makes a living as a freelance writer, blogger, and owner/lead copywriter at Tanzek Media.When she is not typing away on the computer, she loves to spend time indulging in some of her favorite creative outlets and enjoying the great outdoors. Briana is a huge advocate for “freeing your inner child,” and encourages her fellow Moms to make stress-free FUN a priority in their lives.Briana’s blog Major League Mommy focuses on effective Parenting Made Fun. You can follow her journey on Facebook, Twitter, Instagram, and Pinterest.